
On the way looking for a new affordable 5GHz router I found the inexpensive and good-looking Xiaomi Router 3G.
With its technical specification it fits to my needs at all. Unfortunately I am unable to read and understand Chinese. Moreover I would rather like to rely on a more open-sourced firmware. With alternative firmware and TP-Link routers (preferred for use with Freifunk running OpenWRT) I already gathered great experience in performance and stability.
There are several possibilities now:
- Use the router as intended
- Use the router as intended, but replace the firmware for english language as soon as international firmware is available (HK release?)
- Use the router AS NOT intended and flash LEDE
- Use the router AS NOT intended and other custom roms
- As Xiaomi enthusiast this is another addition to the wide range of Xiaomi products you are already owning. You neither touch the package nor let other people grab it. Unboxing videos of Xiaomi products are torture and pain to you. So you leave it as it is – securely locked in a room, supervised by latest Xiaomi cams and a radio-controlled Xiaomi toy robot that fights all intruders.
I prefer way number 3.
Technical specs
Good hardware value for the price.
- MediaTek MT7621AT (DualCore, 880 MHz)
- 128 MB Flash
- 256 MB RAM
- 2 x RJ45 GBit LAN
- 1 x RJ45 GBit WAN
- 1 x USB 3.0 Port
- WLAN standard a,ac,b,g,n
- WiFi Distance : 100m
- WLAN 2.4GHz (300Mbit/s)
- WLAN 5GHz (867Mbit/s)
- 12V/1.5A
Compared to current TP-Link routers (12V 4-5A), the power supply is rather small-scaled.
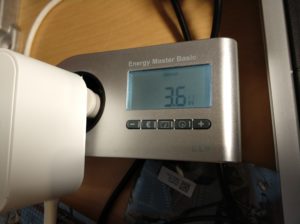
It consumes around 4 Watts which is great for the price and the processing power. Other comparable WiFi router with similar specs are with 11 Watts greedier concerning its power consumption.
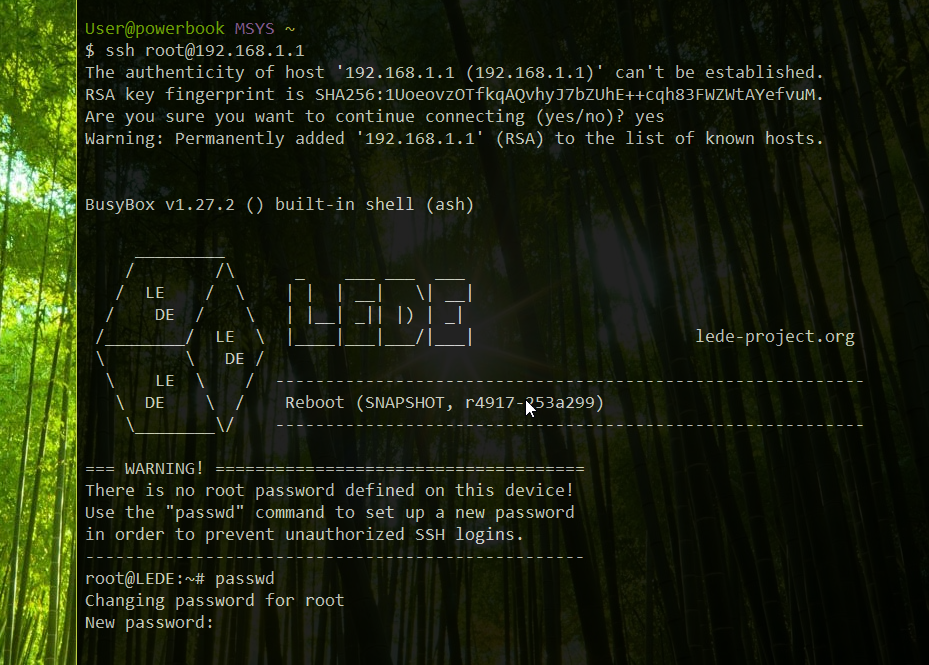
Flash LEDE on Xiaomi Router 3G
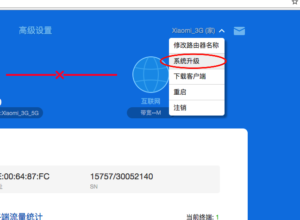
If changing the webinterface language is not enough for you and you do have a little experience in flashing firmware to router devices, you are right here.
As time of exploring, I was lucky to be right 2 minutes after “hammer” smashed his nice tutorial on the LEDE forum to give a like – Thanks to all members, especially dissent1 who added the device!
Original short instruction: https://forum.lede-project.org/t/xiaomi-wifi-router-3g/5377/57
Instructions
- Unbox router, plug in
- Download developer firmware from here http://miwifi.com/miwifi_download.html (firmware download)
- Download LEDE snapshot from here http://downloads.lede-project.org/snapshots/targets/ramips/mt7621/ (lede-ramips-mt7621-mir3g-squashfs-kernel1.bin and lede-ramips-mt7621-mir3g-squashfs-rootfs0.bin)
- Connect to router WiFi network – no credentials neccessary
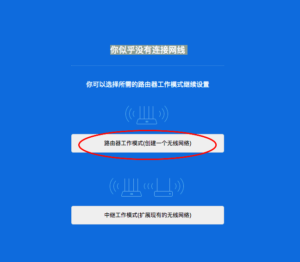
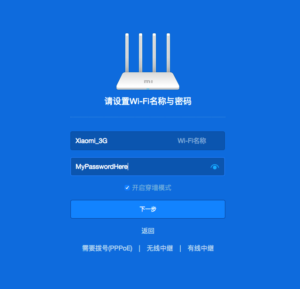
- Go to http://192.168.31.11
- Step through the wizard and set WiFi credentials and router login password
And another form to fill in the router webinterface password – I did not take a screenshot here. - Reconnect to the router using WiFi
- Go to http://192.168.31.11
- Enter set password, go to the menu
- Click on the upload form and select the firmware file.
- Flash miwifi_r3g_firmware_c2175_2.25.122.bin and wait a few minutes.
- Download https://play.google.com/store/apps/details?id=com.xiaomi.router11 to your phone/tablet (there is also an iOS app)
- Open “Mi Wi-Fi” app (and sign-up) and sign-in to your account. Router will be detected and added to your account (assuming you are connected to the WiFi on the router and the routers WAN port is connected to Internet. I just plugged the WAN to my FritzBox router and connected the phone to the Xiaomi WiFi).
- On a PC, visit http://d.miwifi.com/rom/ssh11 and sign-in to you account. You will get to a page that should display your router, the root password and a download button to the right. Agree the download with the right button to download miwifi_ssh.bin.
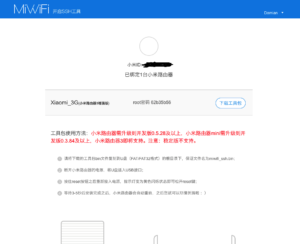
I received some crude 502 gateway errors. Tried some times – works. - Format USB drive using FAT32 and copy miwifi_ssh.bin, lede-ramips-mt7621-mir3g-squashfs-kernel1.bin and lede-ramips-mt7621-mir3g-squashfs-rootfs0.bin to the USB drive
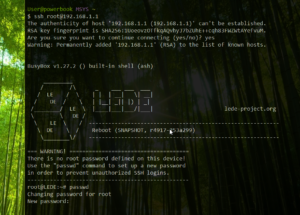
- Power off the router, plug the USB drive in the router, press and hold “reset” button (with a paper-clip), power on the router (while holding reset). When the router starts flashing yellow slowly, release the reset button. Wait until router has rebooted and you should (finally…) have SSH access.
- Login to the router using SSH (while connected to router wifi) using the “root” as username and the (root) “password” from http://d.miwifi.com/rom/ssh11
- In SSH console
cd /extdisks/sda1 (can be different if you remove and reinsert the usb stick)
mtd write lede-ramips-mt7621-mir3g-squashfs-kernel1.bin kernel1
mtd write lede-ramips-mt7621-mir3g-squashfs-rootfs0.bin rootfs0
nvram set flag_last_success=1
nvram commit
reboot - LEDE should be installed and available at 192.168.1.1 (WiFi is still disabled yet)
- Upgrading to a newer snapshot can be done using the regular methods (from the command-line using sysupgrade or through LuCI) using lede-ramips-mt7621-mir3g-squashfs-sysupgrade.tar
Configure LEDE
After steps above:
- connect your computer via LAN to the router on Port 1
- SSH to root@192.168.1.1
- After logged in successfully, use passwd to change the root password.
- Configure WiFi (original reference taken from LEDE forum)
config wifi-device 'radio0' option type 'mac80211' option hwmode '11g' option path 'pci0000:00/0000:00:00.0/0000:01:00.0' option htmode 'HT20' option country 'DE' option channel '13' option log_level '4' option txpower '17' config wifi-iface 'default_radio0' option device 'radio0' option network 'lan' option mode 'ap' option ssid 'Network' option key 'makemehappy' option encryption 'psk2+ccmp' option wpa_group_rekey '1800' config wifi-device 'radio1' option type 'mac80211' option hwmode '11a' option path 'pci0000:00/0000:00:01.0/0000:02:00.0' option htmode 'VHT80' option channel '44' option country 'DE' option log_level '4' option txpower '17' config wifi-iface 'default_radio1' option device 'radio1' option network 'lan' option mode 'ap' option ssid 'Network_5G' option key 'makemehappy' option encryption 'psk2+ccmp' option wpa_group_rekey '1800' - Continue using the official user guide. https://lede-project.org/docs/user-guide/wifi_configuration
Зовем зайти : остекление в Екатеринбурге окна для веранды цена о теплом и холодном остеклении объектов. безрамное остекление .
Lo mas importante al usar el codigo promocional 1win: https://lazosdeamormariano.net/modules/pages/?c_digo_promocional_112.html es introducirlo a tiempo. Este codigo te da derecho a recibir un bono del 500% por un importe total de hasta $1025.
888starz apk https:// .
Бесплатные промокоды Mostbet при регистрации 2025. Получить бонус на сумму 35000 рублей могут все новые участники клуба. Регистрируйте аккаунт по электронной почте или через привязку аккаунтов популярных социальных сетей и получайте бонусом до 35000 рублей на первый депозит. Для зачисления бонусов необходимо пополнить счет с банковской карты или электронного кошелька, не забыв при этом указать регистрация в по промокоду. Для того чтобы бонус стал доступен к снятию необходимо выполнить простое условие. Выбирайте любое событие, на которое принимаются ставки с коэффициентом от 1.4 и выше.
кредиты под покупку https://abakan.ru/index.php/chto-proiskhodit/v-rossii/item/11486-banki-preimushchestva-i-minusy-uslugi-kak-vybrat .
betwinner cricket betwinner cricket .
Здравствуйте!
Без присутствия диплома достаточно сложно было продвинуться по карьерной лестнице. В наше время этот важный документ не дает никаких гарантий, что получится получить привлекательную работу. Более важны практические навыки и знания специалиста и его постоянный опыт. Поэтому решение о заказе диплома можно считать выгодным и целесообразным. Купить диплом об образовании l-avt.ru/support/dialog/?PAGE_NAME=profile_view&UID=101251
Играйте в онлайн-казино вавада fun и наслаждайтесь азартными играми с увлекательными сюжетами и крупными выигрышами.
На сайте вы найдете актуальное рабочее зеркало казино vavada на сегодня, а также информацию о работе Vavada зеркала на сегодняшний день.
Информация о официальном сайте онлайн-казино вавада: бонусы, игры, условия игры и многое другое.
олимпбет – перспективная букмекерская контора с актуальными условиями и возможностью обзавестись выигрышами в 2024 году.
Hi,
does anyone has the developer firmware for 3g? I can’t download it from the official Xiaomi website.
Best
Pablo José
Hi,
I have got pretty much the same problem,
I followed the instructions above, everything ok, but I cannot acces 192.168.1.1 in browser or via SSH (yes, I am using LAN port on router). So I booted fail safe mode, SSH, factory reset. Now I can acces it via SSH in normal mode, but still cant via UI on browser. Is there any way to fix this, or to revert back to xiaomi firmware?
Thank you wery much for every answer!!!!
Marek
Have you installed LUCI ?
If not , try
opkg update
opkg install luci
Now you should have the GUI … called LUCI
Hi, I also could not connet after SSH flash finished and reboot. In my panic I pressed reset button but now I cannnot connet also on SSH or Telnet. I know how to get into failsafe mode than blue led is blinking very fast. I gave a static IP but still no connection to the 3G router. Please help!
I need some help, I met all the steps, until 18, restart the router, but I do not have access either by SSH or the web, it connects me rejected. I am testing 192.168.1.1 accordingly, and even the dchp assigns me an address of that range. The ping responds, but rejects all access, what can I do? a detail, the files of point 3 are no longer called LEDE, but openwrt. can you help me? Thank you.
I have followed the steps in this guide but eventually after flushing I could not connect to the router via ssh. I have tried to boot into the fail safe mode and do the factory reset and it worked. Now I could access the router.
How did you do that? I know failsafe mode is when blue LED is blinking very fast, right? What did you do than? In failsafe mode I also could not connect to Mi 3G router in SSH or Telnet. Please help.
How did you do that? Please answer.
How did you do that? Please help
I need some help, I met all the steps, until 18, restart the router, but I do not have access either by SSH or the web, it connects me rejected. I am testing 192.168.1.1 accordingly, and even the dchp assigns me an address of that range. The ping responds, but rejects all access, what can I do? a detail, the files of point 3 are no longer called LEDE, but openwrt. can you help me? Thank you.
Try connecting to LAN port not WAN port on the device.
How can I revert back to the Xiaomi image?
Hi Damian,
What can i do when the url in step 14 is not available? Is there a way to skip this step?
Thx in advance!
Kevin
Play around with http:// vs https://
they redirect anyway to port 8080 but seems like its fluctuates from day to day to SSL or non-SSL traffic.
So is there an english version of the 3G router or not?
You can switch from open wrt to Padavan?
Step 5 and 8, please correct http://192.168.31.11 by http://192.168.31.1
At step 14, if you can’t download the ssh patch “miwifi_ssh.bin”, try this:
https://d.miwifi.com/rom/ssh/download?sn=XXXXX%2FXXXXXXXX&userId=YYYYYYYYYY
but replace before XXXXX and XXXXXXXX by your router serial number (found on your router web User interface) (Format XXXXX/XXXXXXXX) and YYYYYYYYYY by your Mi account id (found on account.xiaomi.com)
Make attention to use https and not only http. The http server doesn’t work anymore.
edit:
use before this address in order to get the root password:
https://d.miwifi.com/rom/ssh?userId=YYYYYYYYYY
thanks ramanvda!
Obtaining the miwifi_ssh.bin worked like as described, but for the password I had to use:
https://d.miwifi.com/rom/ssh?sn=XXXXX%2FXXXXXXXX&userId=YYYYYYYYYY
Friends > Use Chorme
thanks for the very useful link
Do you know how to be back to stock firmware?
Thanks,
Bruno
I have this doubt too.
HI Damian,
I used the wrong firmware for router 3G. So now, router 3G reboot indeterminate. What can I do now.
Thanks you
Nghia Hoang
Hi Damian,
I like your guide! Does the router 3 and 3g use the same firmware? The video shows the change of language for a xiaomi router 3.
thanks in-advance
Dennis
Hi Dennis,
thanks for asking – you are right. You can’t use the Mi Wifi router 3 firmware for the Mi Wifi router 3G.
International firmware is available for the Mi Wifi Router 3 only. 🙁 I changed the post accordingly and removed the youtube link.
I just checked it on the Router 3 which I am also running.
Until its release in Hong Kong, there won’t be an international firmware available.
Hmm my comment wasn’t approved? You don’t have to be that rude if you don’t want to help, anyway still a nice guide. Hope you can consider my request.
Hi iSkios,
there was no intention to block your comment 🙂 that was done by the anti-spam system.
I will play around a bit over the next weeks. Maybe I will have a look at padavan!
If you still want to use LEDE, make sure to set a proper WiFi channel (for 2.4 and 5GHz) and to apply the right country code.
Best
Damian
Hi Damian,
Wow thanks for your reply, looking forward to that guide.
I might not consider LEDE, the interface looks very complicated and not user friendly. I want a simple interface with advance features and in English =), which Padavan might support.
warm regards,
iSkios
Very nice guide and noob friendly, can you also post a step by step guide for a Padavan firmware? 4pda have a guide and a video but its all in russian. Hope to see an English guide like this. Thanks!